

Vendor Registration Guide
A simple, picture-by-picture guide to becoming an EZZY Vendor
| What you will do 1. Open EZZY 2. Create your vendor account 3. Add your business details 4. Upload your documents 5. Verify your identity 6. Review and submit |
Before You Start
- Have a working email address.
- Have your business information ready.
- Have the documents requested by EZZY ready as clear photos or files.
- Have a valid government-issued ID ready.
- Have a phone or computer that can take or upload photos.
Important: The documents shown on the screen can depend on whether you register as a Company or Individual. Always follow the documents EZZY asks for on your screen.
Step 1 — Go to EZZY
Open the EZZY website (https://ezzy.ph). On the home page, look for the button that says “Become a Partner.” Click it.
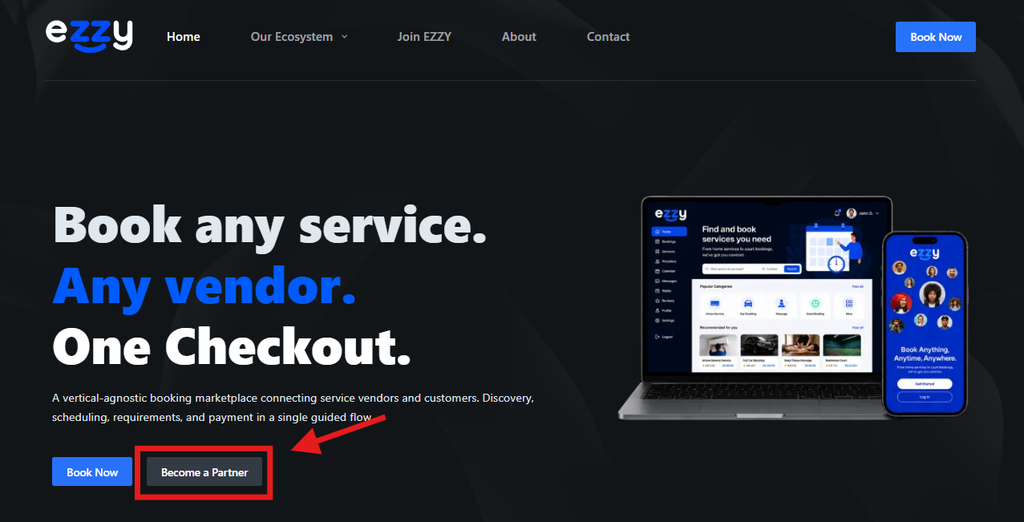
Screenshot 1 — Look for the highlighted button or section.
| Easy tip: A vendor is a business or person who offers something for customers to book or buy on EZZY. |
Step 2 — Choose your business or service category
After clicking “Become a Partner,” EZZY will show a category selection window. Choose the business type or service that best matches what you offer, such as Salon, Barber, Nail Salon, Hotel, Massage Center, or another available category.
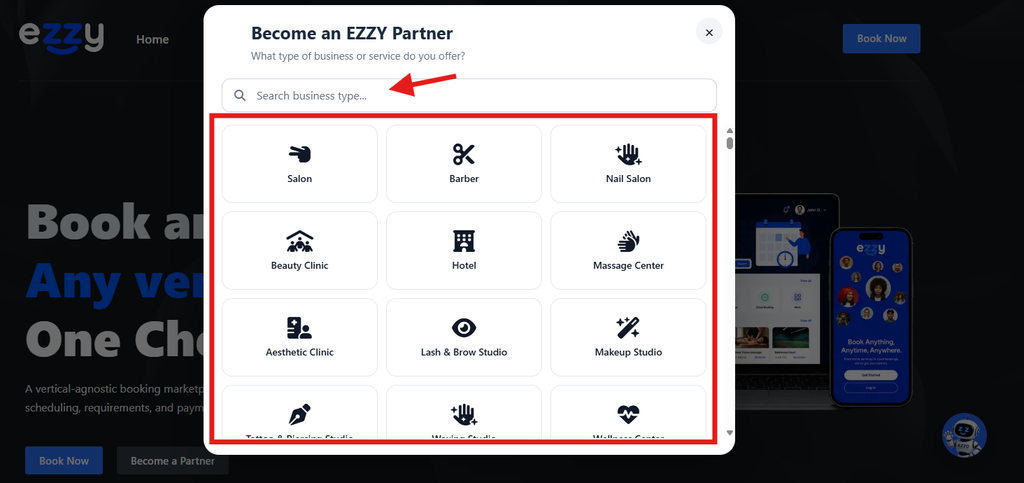
Screenshot 2 — Select the category that matches your business or service.
| Easy tip: Choose the category that best describes the service you want to offer on EZZY. This selection determines the EZZY division for your vendor registration. |
Step 3 — Start your vendor registration
After selecting a category, you will be redirected directly to the Vendor Portal registration page. If you do not have a vendor account yet, click “Register Your Business.”
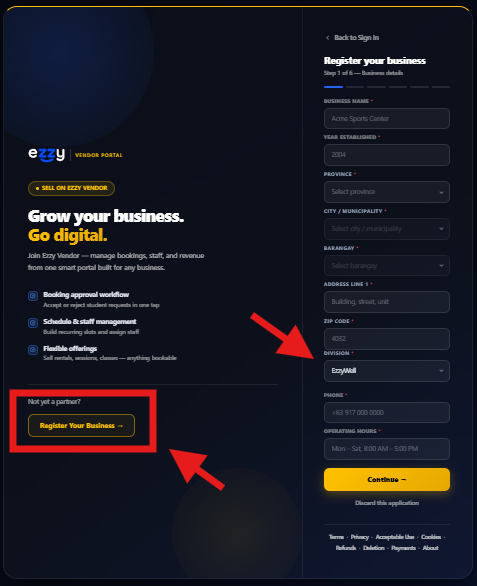
Screenshot 3 — Look for the highlighted “Register Your Business” button or section.
| Easy tip: You do not need to sign in first if you are creating a new vendor account. |
Step 4 — Enter your business details
Fill in the business information. Type the business name, year established, province, city or municipality, barangay, address, ZIP code, phone number, and operating hours.
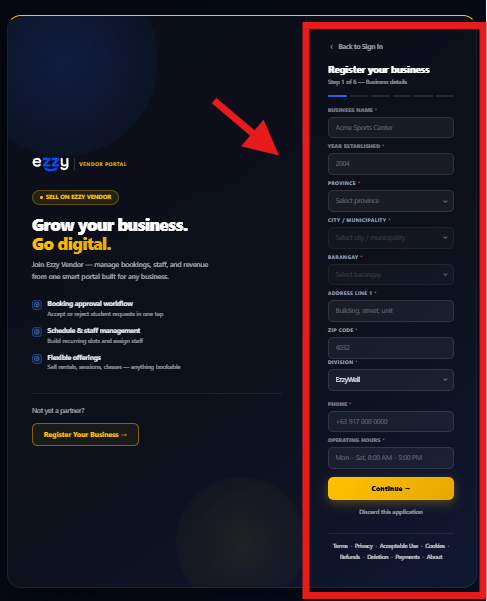
Screenshot 4 — Enter your business information.
| Easy tip: Fields with a red (*) are required. Check your spelling before you continue. |
Step 4.1 — Choose your EZZY division
The EZZY division is now automatically filled in based on the category you selected at the beginning of the registration process. In the example, selecting a relevant category automatically fills the Division field as “EzzyWell.”
You do not need to choose the division manually. This helps make sure your vendor is registered under the correct EZZY ecosystem.
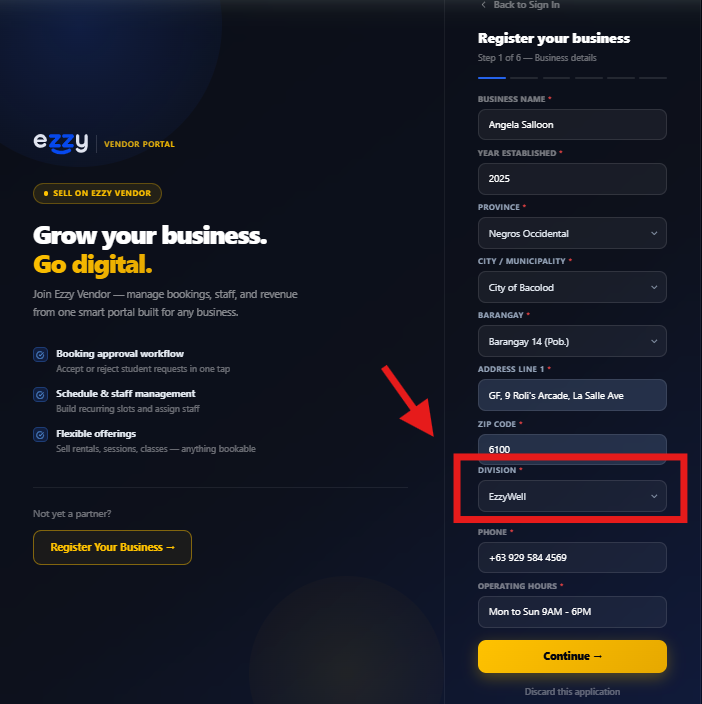
Screenshot 4.1 — The Division field is automatically filled based on the selected category.
| Easy tip: Make sure the automatically selected division is correct before continuing. If something looks incorrect, contact the EZZY team before submitting. |
Step 5 — Create your account
Enter your full name, email address, password, and confirm your password. Then click “Continue.”
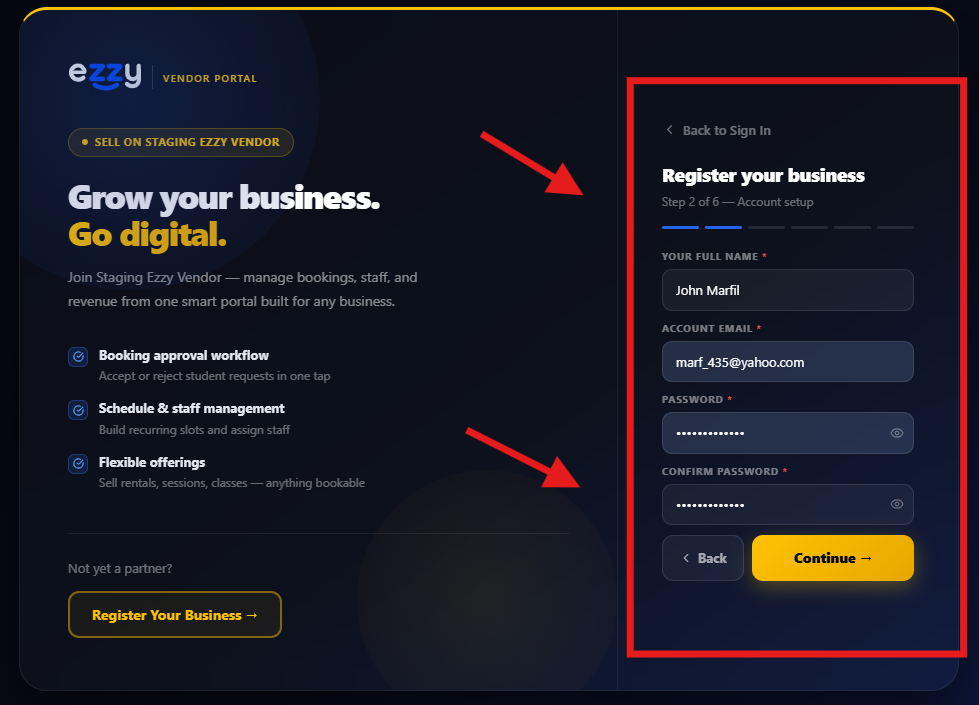
Screenshot 6 — Look for the highlighted button or section.
| Easy tip: Use an email address that you can open. You will need it for your EZZY account. |
Step 6 — Choose who is applying
Choose either “Company” or “Individual.” Select “Company” for a registered business. Select “Individual” if you are registering as a sole proprietor or freelancer.
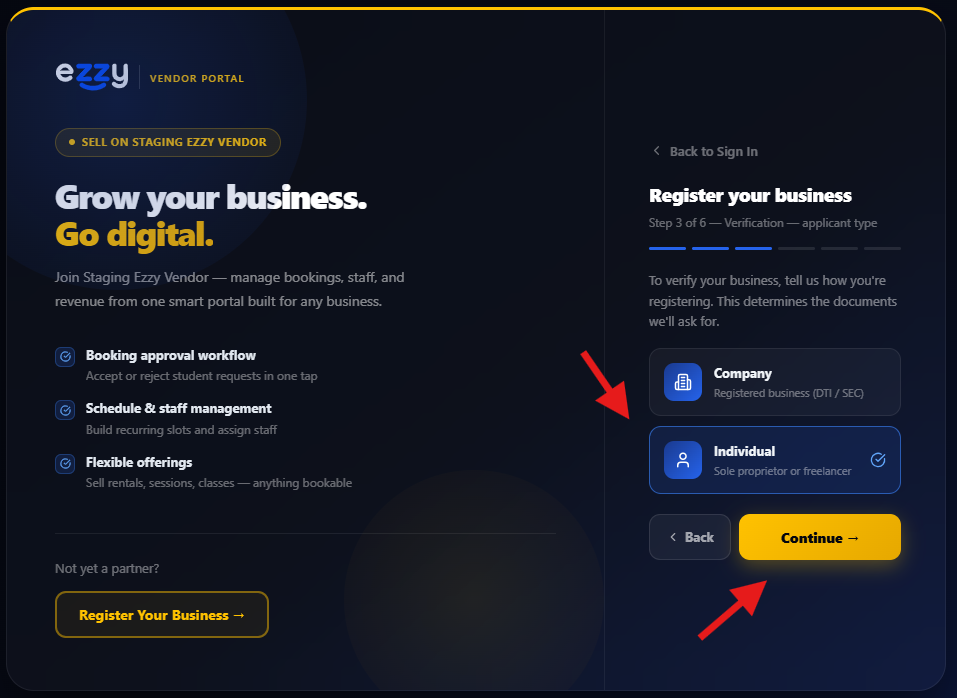
Screenshot 8 — Look for the highlighted button or section.
| Easy tip: Pick only one. The choice affects which documents EZZY asks you to provide. |
Step 7 — Upload your business documents
Upload the documents requested on the screen. You can add a document by typing its name, clicking “Attach,” and choosing the file from your device.
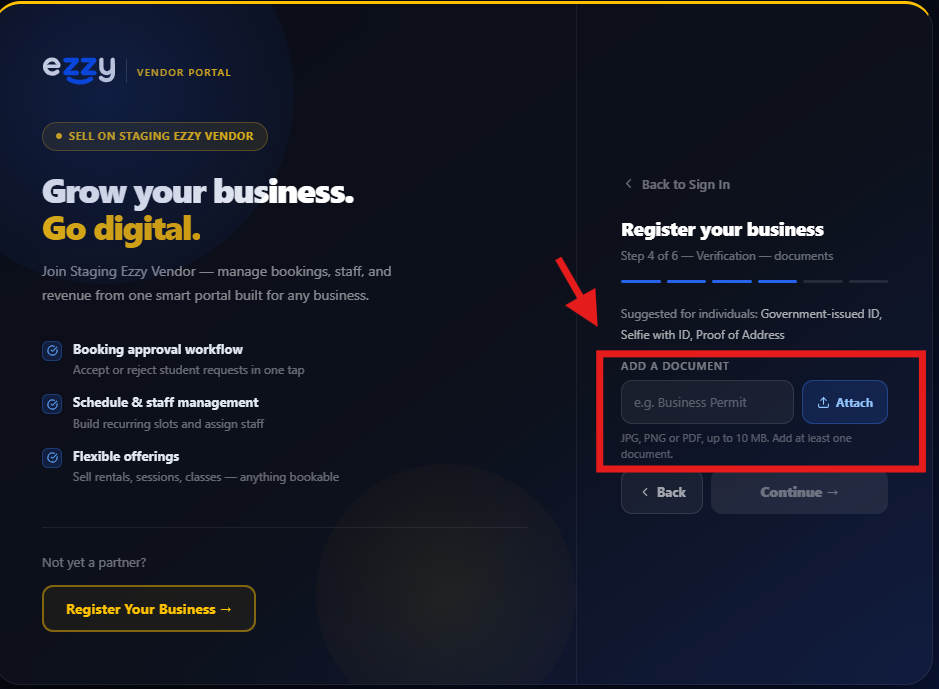
Screenshot 9 — Look for the highlighted button or section.
| Easy tip: The screen says JPG, PNG, or PDF files can be uploaded, up to 10 MB each. Add at least one document. |
Step 8 — Check your uploaded documents
After uploading, check the list. Make sure every file is the correct document and is easy to read. Remove a wrong file using the “X” if needed. Then click “Continue.”
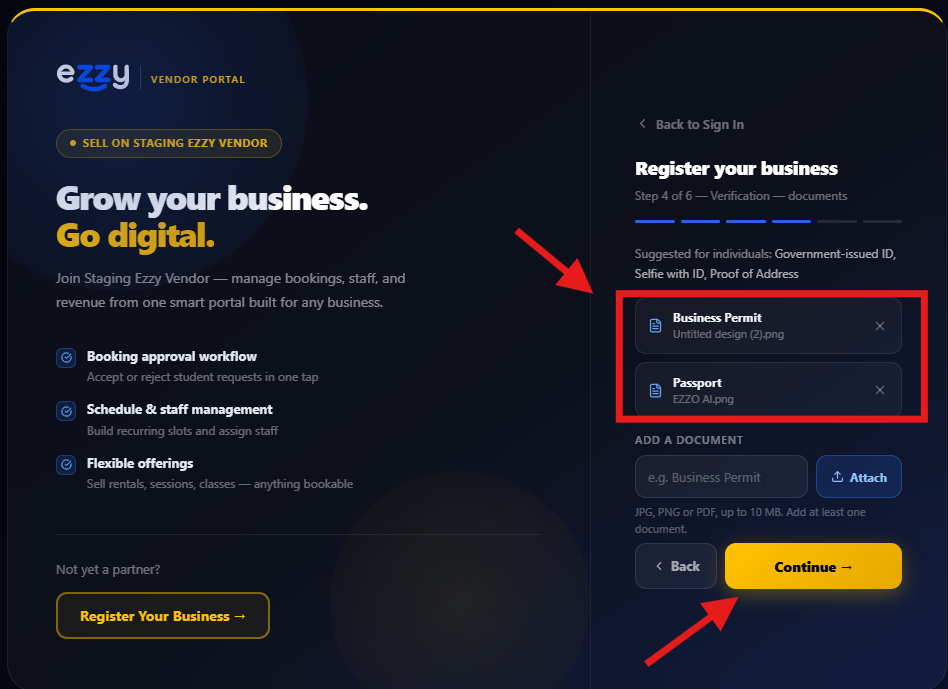
Screenshot 10 — Look for the highlighted button or section.
| Easy tip: Do not upload a blurry, cut-off, or wrong document. |
Step 9 — Verify your identity
EZZY asks for two things: (1) a clear photo of a valid government ID and (2) a selfie of you holding the same ID below your face.
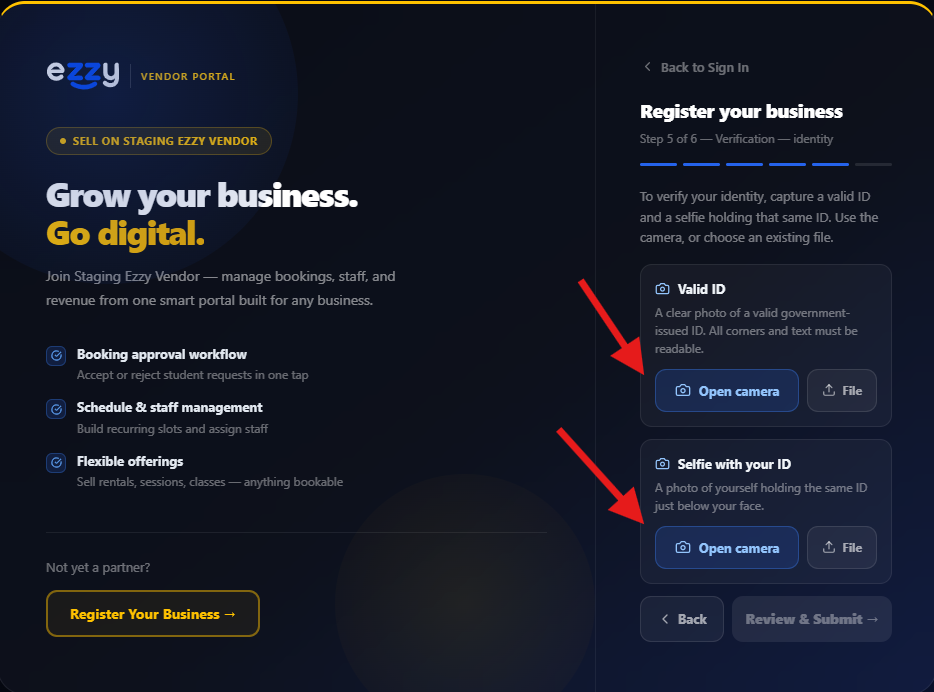
Screenshot 11 — Look for the highlighted button or section.
| Easy tip: You can use the camera or choose a file, depending on what the screen shows. |
Step 10 — Make sure your ID photos are accepted
When a document is captured successfully, it will show “Captured.” Check both boxes: your valid ID and your selfie with your ID.
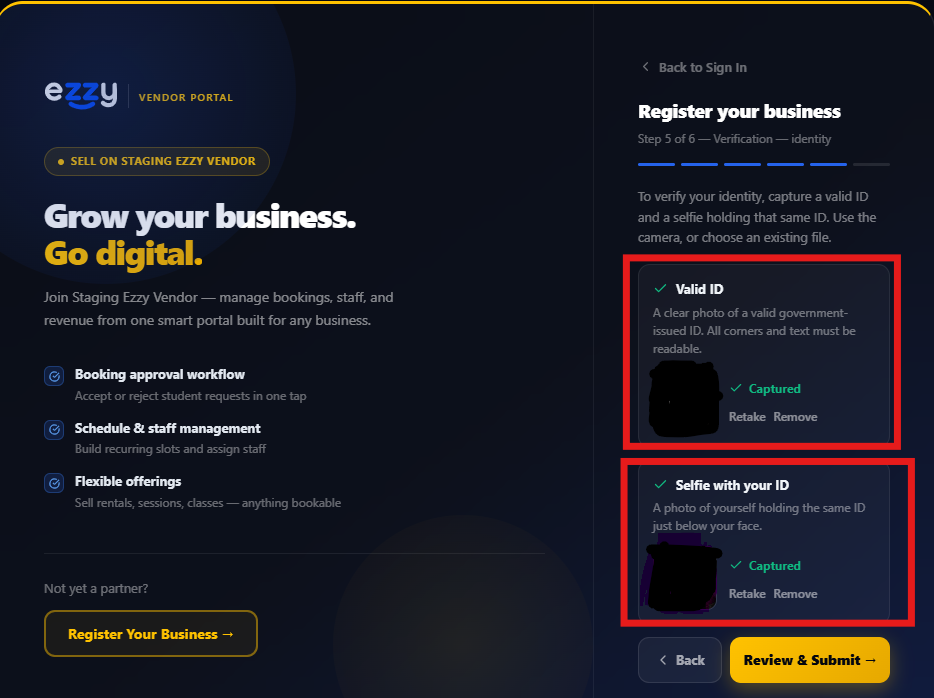
Screenshot 12 — Look for the highlighted button or section.
| Easy tip: Make sure the ID corners and words can be read clearly. |
Step 11 — Review your application
EZZY will show a summary of your application. Check the business name, applicant type, email, and documents one more time.
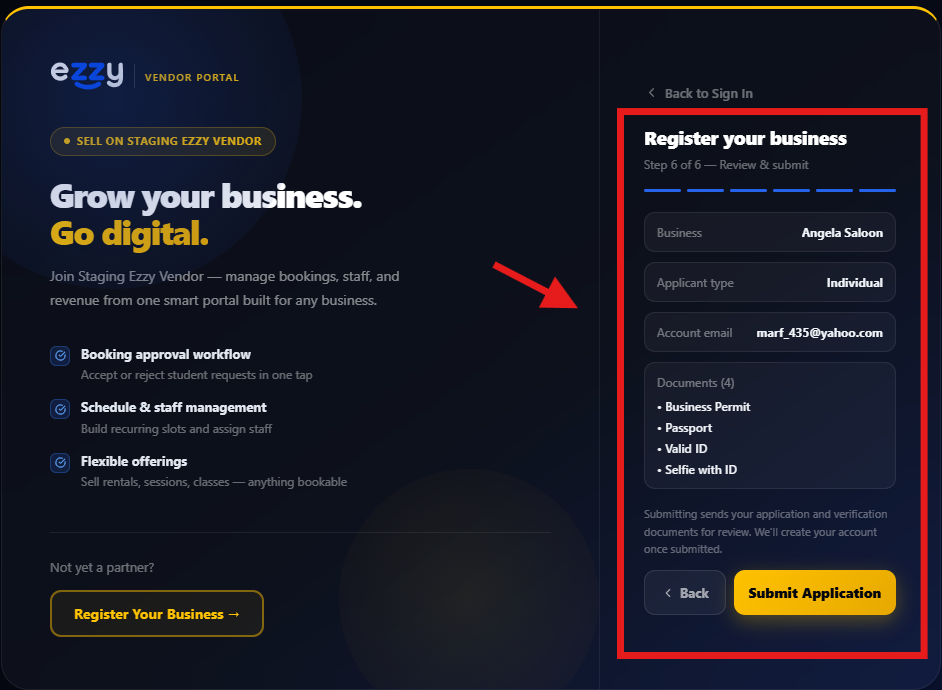
Screenshot 13 — Look for the highlighted button or section.
| Easy tip: This is your last chance to catch a mistake before sending the application. |
Step 12 — Submit your application
If everything is correct, click “Submit Application.” Wait while EZZY sends your application and verification documents for review.
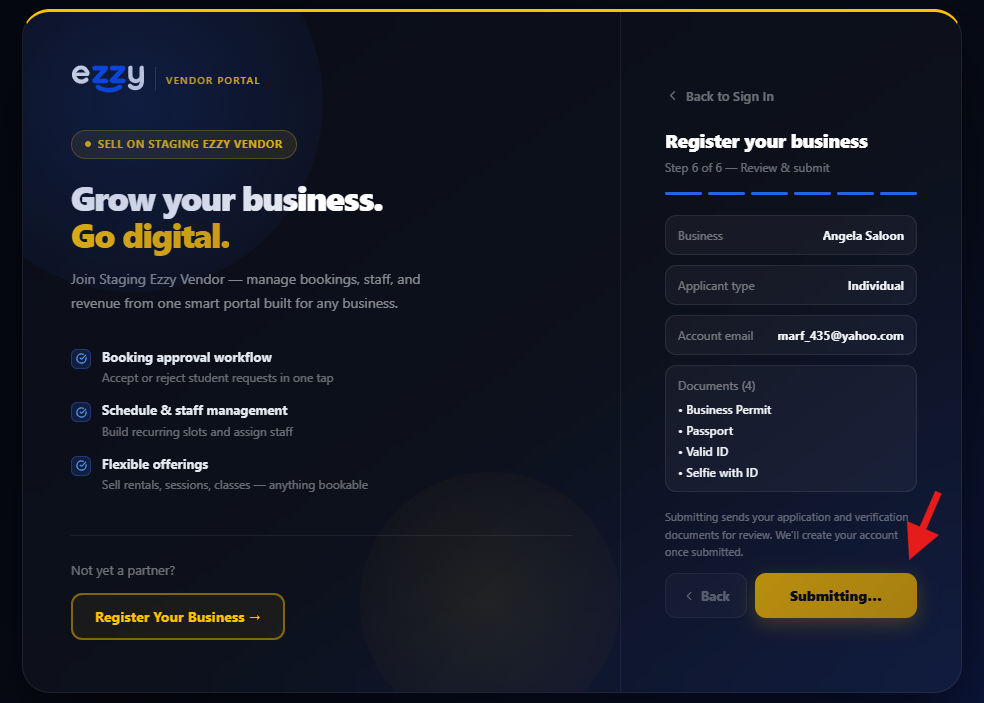
Screenshot 14 — Look for the highlighted button or section.
| Easy tip: Do not close the page while it is submitting. |
Step 13 — Application submitted!
You are done! You will see “Application submitted!” EZZY says it has received your application and sent a confirmation email.
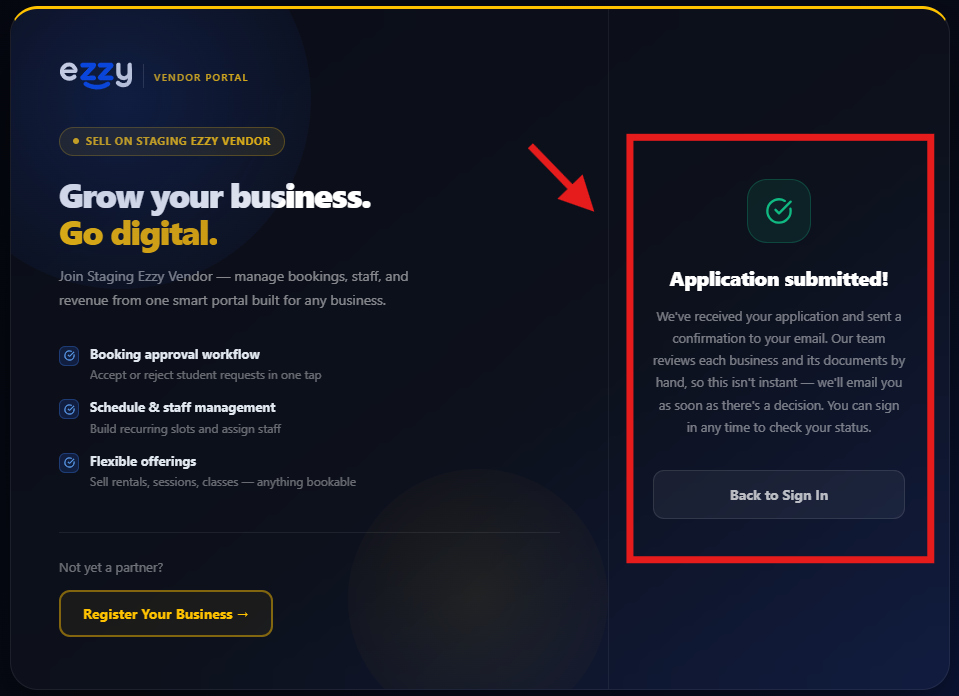
Screenshot 15 — Look for the highlighted button or section.
| Easy tip: The application is reviewed by the EZZY team. Check your email for updates and use the vendor sign-in page to check your status. |
You’re Done!
Your vendor application has been sent to EZZY for review.
- Check your email for the confirmation message.
- Wait for EZZY to review your application.
- Keep your login email and password safe.
- If EZZY asks for another document, provide the requested file.
Simple rule: Read each screen, fill in the correct information, upload clear documents, check your work, then submit.
How to Create an Offering and Make It Bookable
A very simple step-by-step guide for EZZY Vendors
| What is an Offering? An offering is the product or service you want customers to book. Example: Toyota Vios rental, massage, driving lesson, court booking, room rental, or another service your business provides. |
Very Important
- Customers book your OFFERING. You do not normally create the customer booking yourself.
- First create the offering. Then create a schedule so customers know when it is available.
- If a staff member is needed, add the staff member and attach them to the schedule.
- Always check the price, dates, capacity, and staff before making the offering available.
Part 1 — Sign in to your Vendor Portal
Open the EZZY Vendor Portal and enter your email and password. Then click “Sign In.”
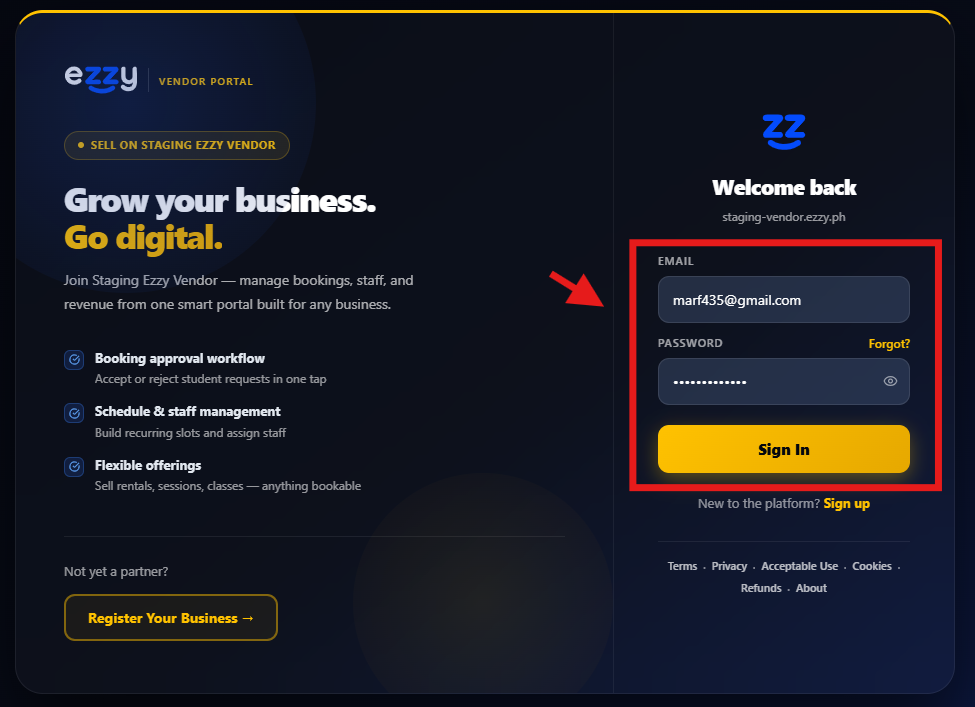
| Easy tip: Use the same email and password you used when you registered. |
Part 2 — Start your first offering
If EZZY shows “Complete your account,” click “Create an offering.”
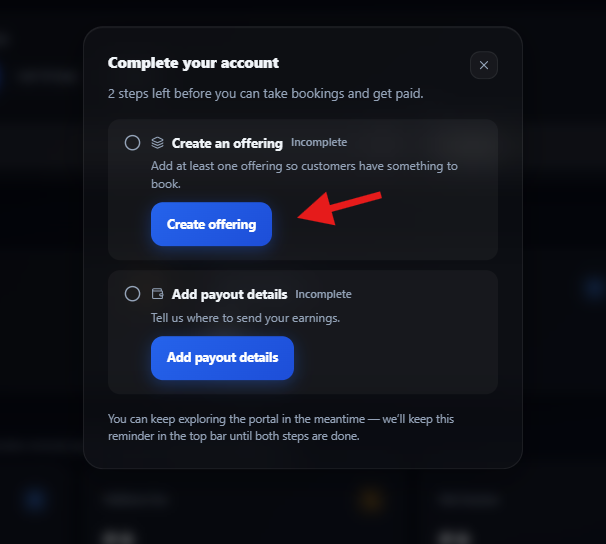
| Easy tip: An offering is the product or service customers can book. |
Part 3 — Fill in your offering details
Enter the information about what you sell or provide. The example is a Toyota Vios rental.
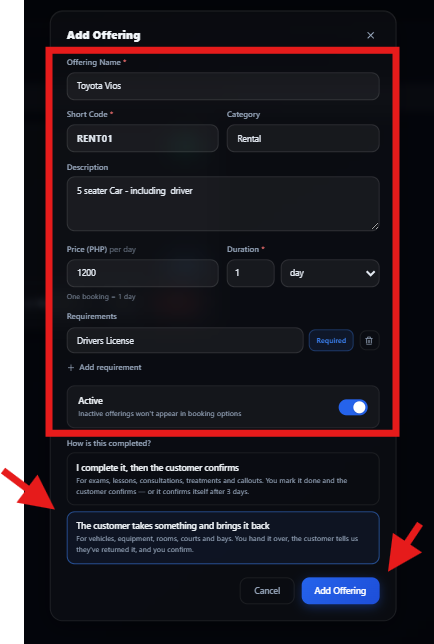
| Easy tip: Keep the name simple and easy to understand. |
Part 4 — Choose the offering name
Type the name customers should see. Example: “Toyota Vios.”
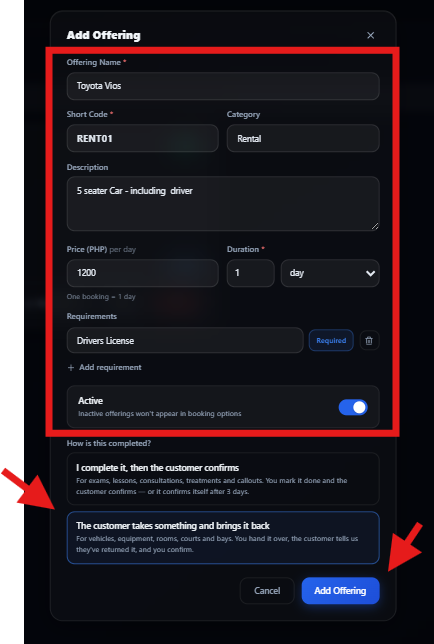
| Easy tip: Use a clear customer-friendly name. |
Part 5 — Add the short code
Give the offering a short code, such as “RENT01.”
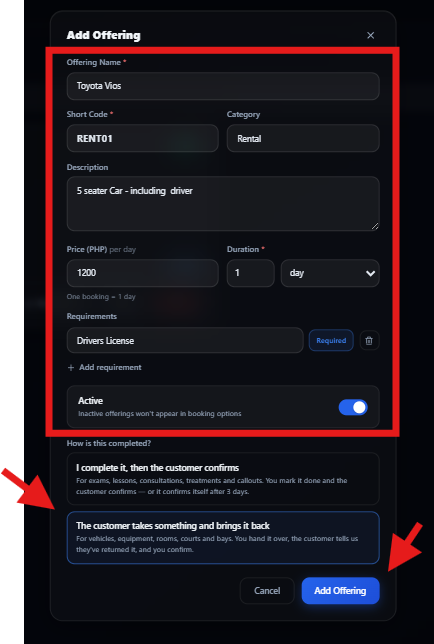
| Easy tip: Keep the code short and unique. |
Part 6 — Choose the category
Select the category that best matches your offering, such as “Rental.”
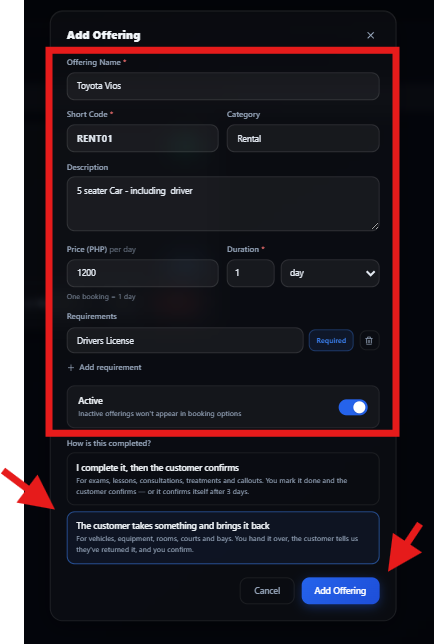
| Easy tip: The category helps keep your offerings organized. |
Part 7 — Write a description
Tell customers what they are getting. Example: “5 seater Car – including driver.”
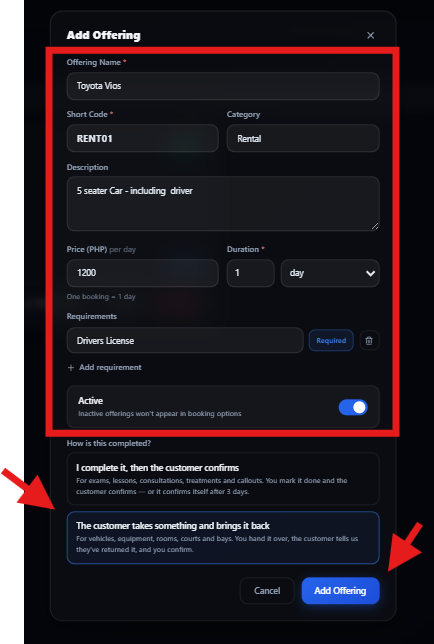
| Easy tip: Use simple words and say what is included. |
Part 8 — Set price and duration
Enter the price and how long the offering lasts. The example shows ₱1,200 for 1 day.
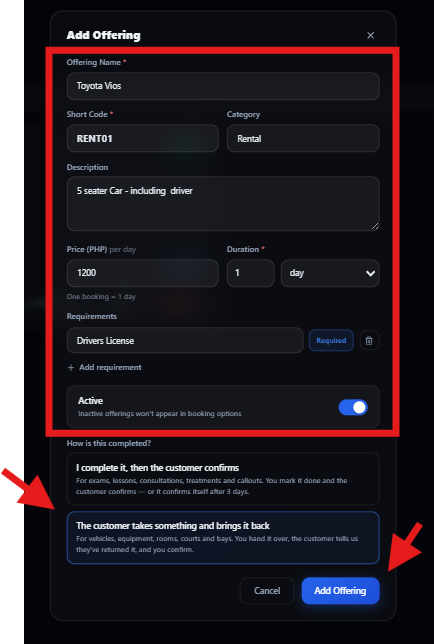
| Easy tip: Double-check the price before saving. |
Part 9 — Add requirements
Add anything the customer must provide or bring. Example: “Drivers License.” You can add more requirements if needed.
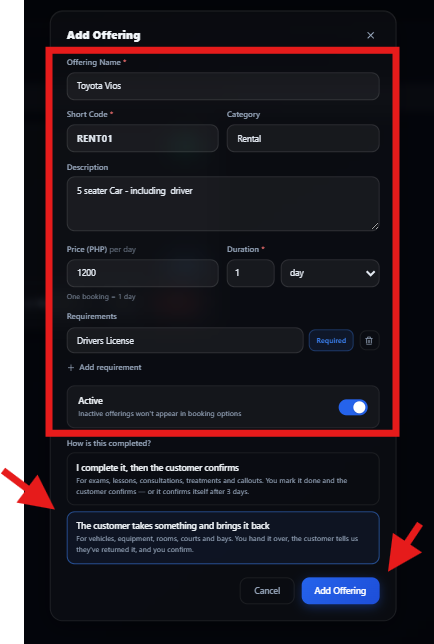
| Easy tip: Only add requirements customers really need. |
Part 10 — Choose how it is completed
Choose the option that best matches your service. For a rental, the customer takes the vehicle and brings it back.
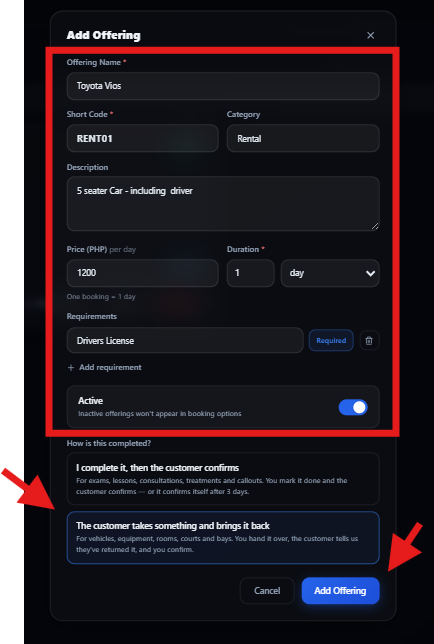
| Easy tip: Read both choices and pick the one that matches your real service. |
Part 11 — Turn the offering on
Make sure the “Active” switch is on if you want customers to see the offering.
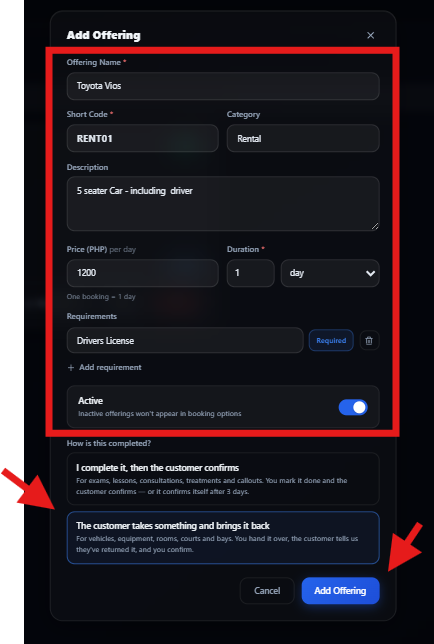
| Easy tip: An inactive offering may not appear for customers. |
Part 12 — Save the offering
When everything is correct, click “Add Offering.”
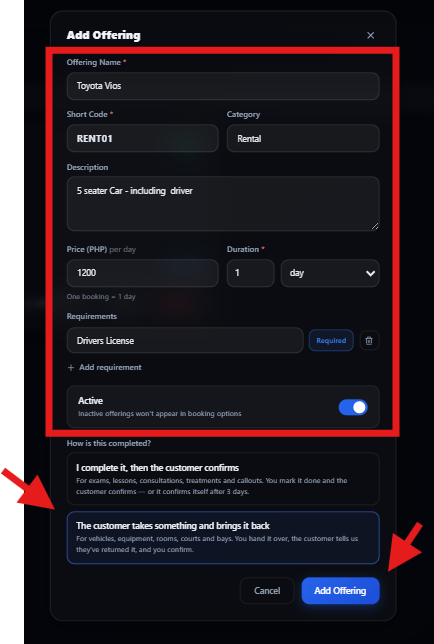
| Easy tip: Check the name, price, duration, requirements, and Active status first. |
Part 13 — Set up the schedule
After saving, EZZY may show “Offering saved.” Click “Set up schedule” to tell EZZY when customers can book it.
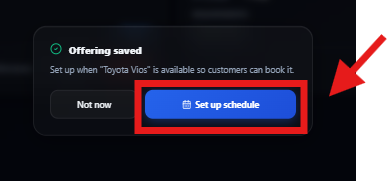
| Easy tip: An offering needs availability so customers know when they can book. |
Part 14 — Create a schedule
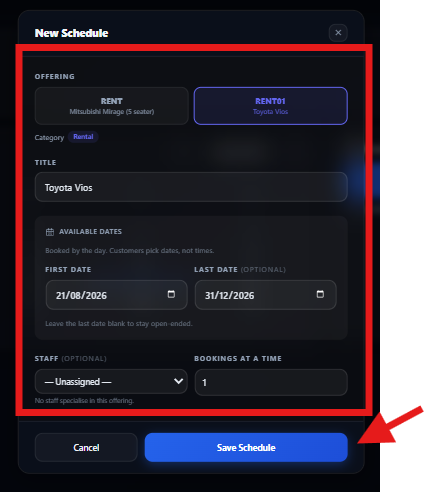
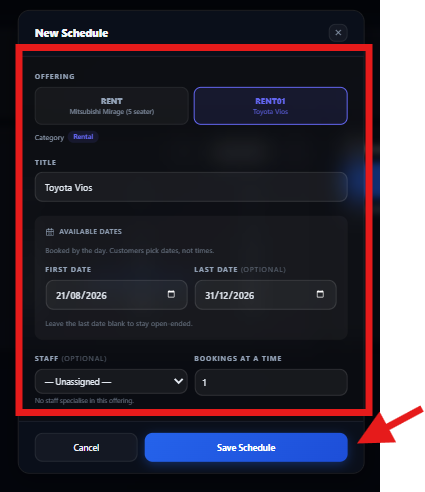
The “New Schedule” window lets you choose the offering, dates, staff, and number of bookings allowed at one time.
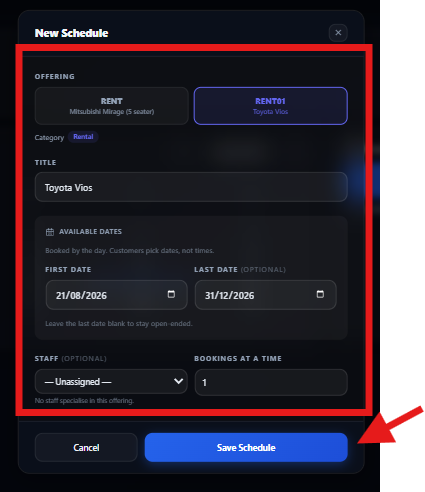
| Easy tip: A schedule tells EZZY when the offering is available. |
Part 15 — Choose the offering
Select the offering you want to make available, such as “Toyota Vios.”
| Easy tip: Make sure you selected the correct offering. |
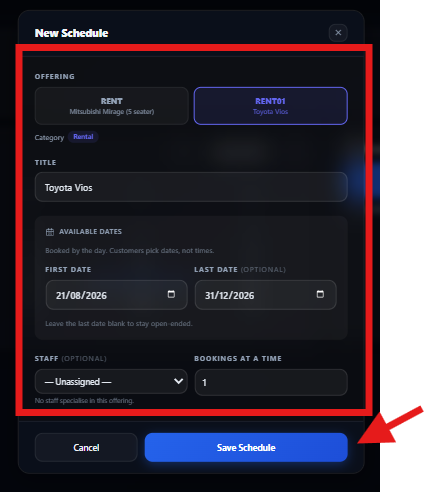
Part 16 — Choose available dates
Enter the first date and last date. Example: 21/08/2026 to 31/12/2026.
| Easy tip: You can leave the last date blank if you want it open-ended. |
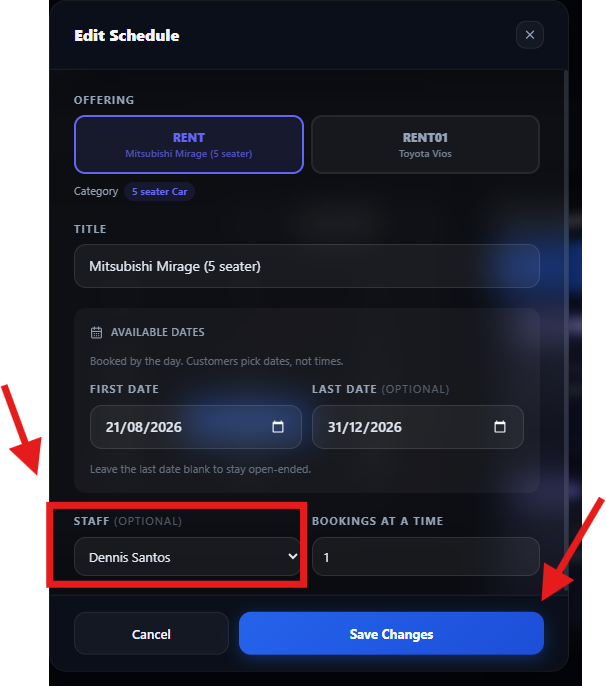
Part 17 — Choose a staff member (optional)
If a staff member will handle the offering, select that person. If not, leave Staff unassigned.
| Easy tip: Staff is optional. Use it when a specific worker needs to handle the booking. |
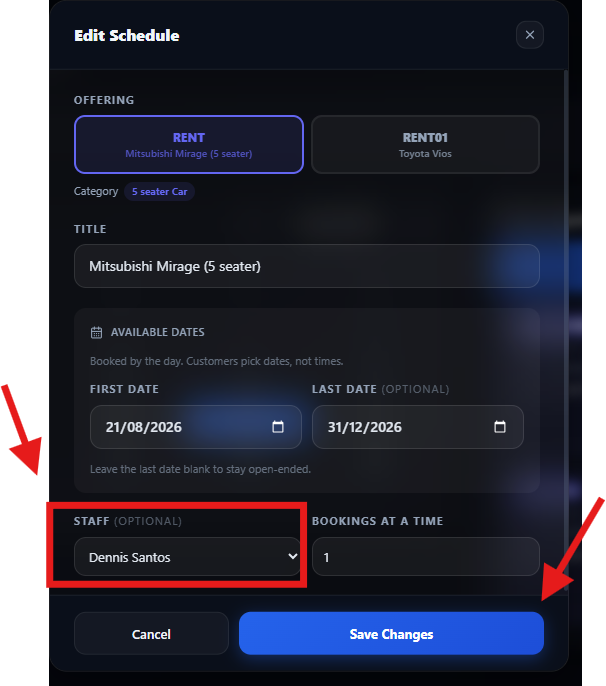
Part 18 — Set bookings at a time
Enter how many customers can book at the same time. Example: “1” means one booking at a time.
| Easy tip: Choose a number that matches your real capacity. |
Part 19 — Save the schedule
Click “Save Schedule.”
| Easy tip: You can edit the schedule later if something changes. |
Part 20 — Check Schedule Maker
Open “Schedule Maker” from the top menu. You can see your calendar and schedules.
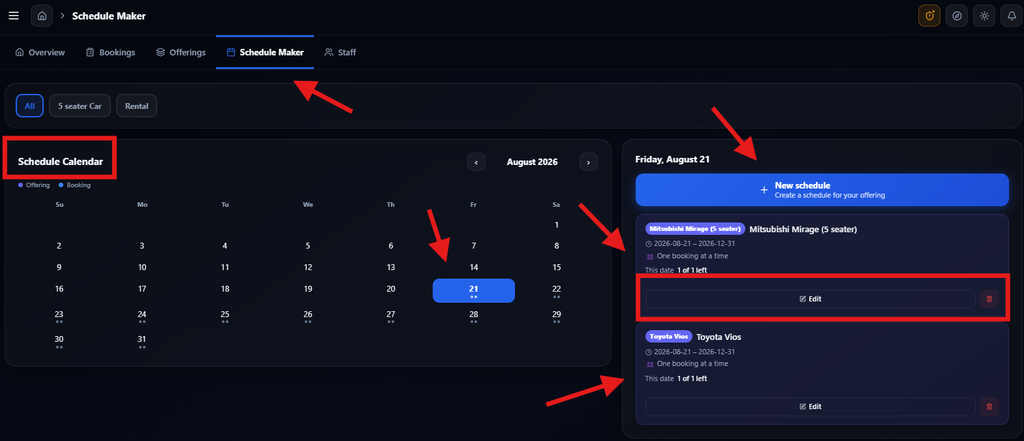
| Easy tip: Look for your offering on the right side. |
Part 21 — Edit a schedule
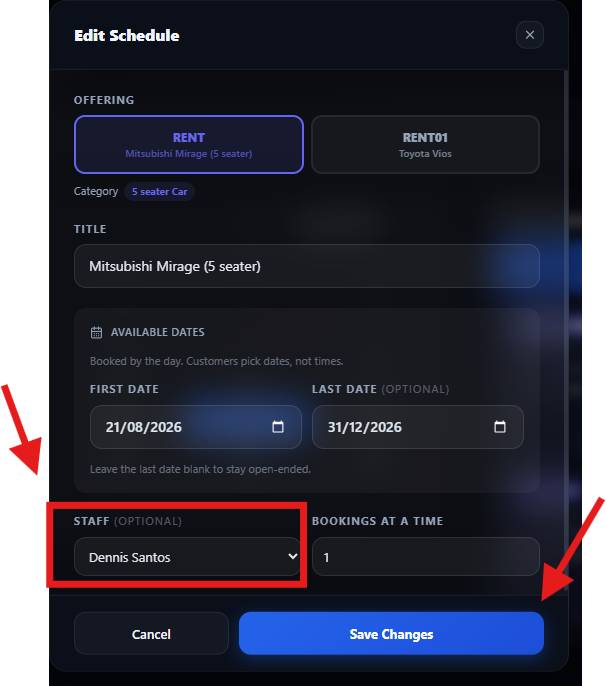
Find the offering and click “Edit.” You can change dates, staff, or booking capacity. Then click “Save Changes.”
| Easy tip: Keep the schedule updated so customers see correct availability. |
Part 22 — Check the assigned staff
After saving, the schedule can show the assigned staff member under the offering.
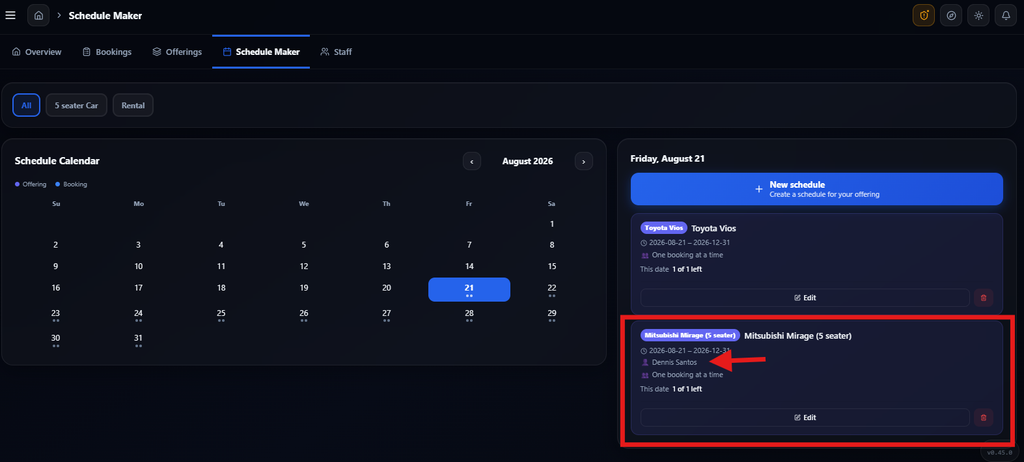
| Easy tip: This is a quick way to check that the correct staff member is connected. |
Optional — Add Your Staff
Optional — Add a staff member
Open “Staff” and click “Add Staff.”
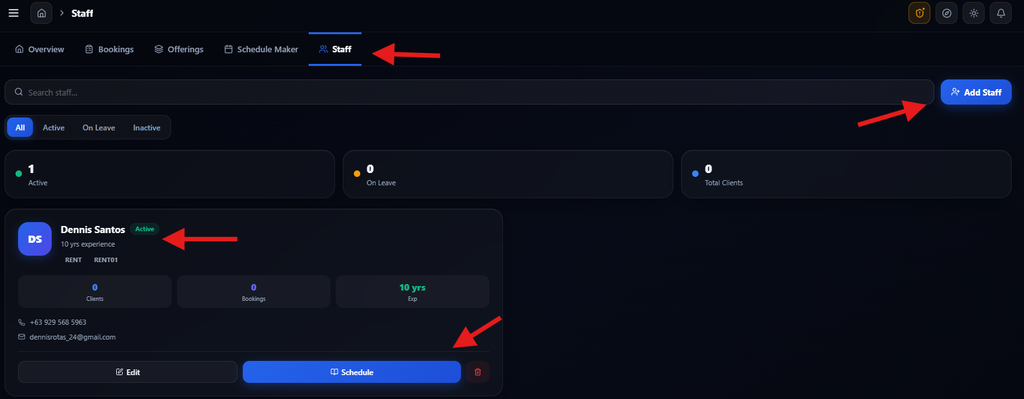
| Easy tip: Skip this if your offering does not use staff. |
Optional — Enter staff details
Enter the staff member’s name, phone, email, experience, and specialties. Then click “Save.”
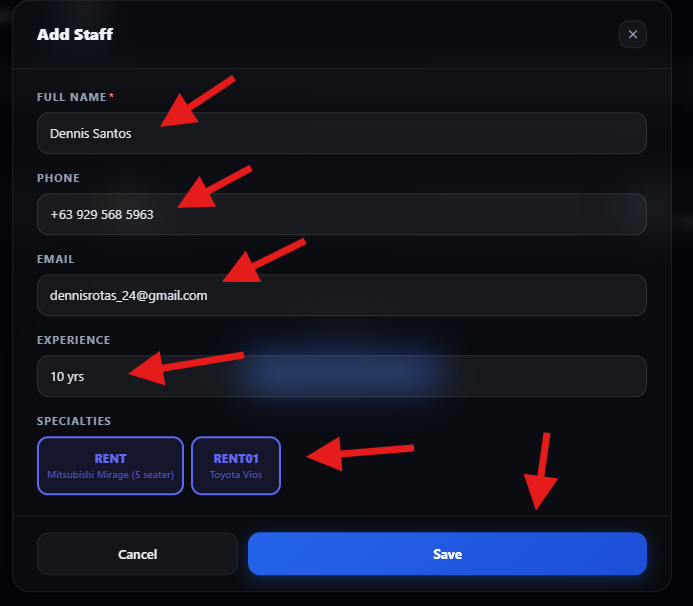
| Easy tip: Choose the offering(s) that this staff member can handle. |
Optional — Check the staff list
The staff member will appear on the Staff page. You can edit the person or use “Schedule.”
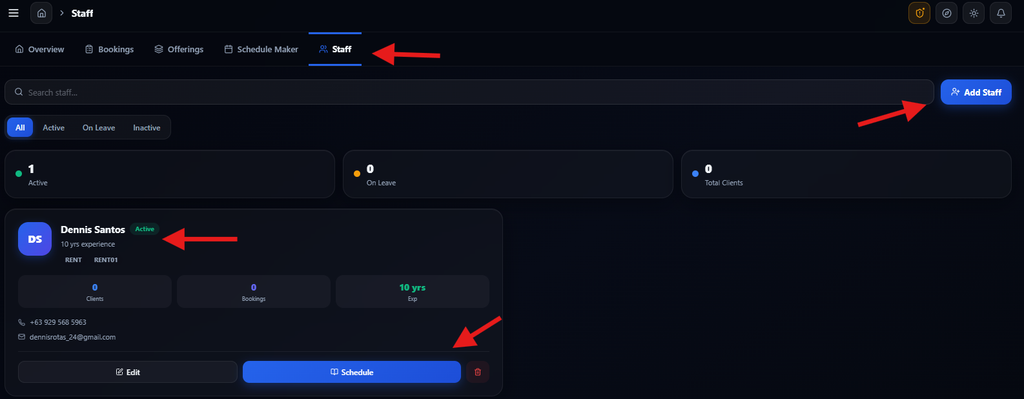
| Easy tip: Keep staff information correct because bookings may depend on it. |
Final Checklist
☐ I created my offering.
☐ I entered the correct price.
☐ I entered the correct duration.
☐ I added the requirements customers need.
☐ I turned the offering Active.
☐ I created a schedule.
☐ I selected the correct available dates.
☐ I selected a staff member if one is needed.
☐ I entered the correct number of bookings allowed at one time.
☐ I checked Schedule Maker and can see my offering.
Remember: Offering = what you sell. Schedule = when customers can book it. Staff = who handles it, if needed.